
CATEGORIES


Below you can find a step-by-step guide on integrating Fishbowl Inventory with StockTrim. By following these instructions, you'll ensure that your inventory data is seamlessly transferred and optimized within StockTrim. This will help you maintain accurate stock levels, streamline your demand analysis, and enhance your overall inventory management efficiency. Let's get started!
Step 1: Check Fishbowl Data
In your Fishbowl account, ensure that your parts/products lists and sales order history are up to date. It helps if your inventory is tracked with current stock levels set, and pricing data up to date.


Step 2: Load data into StockTrim
When you created your account with Fishbowl they would have sent you some details around your server hosting.
{Your companies DNS}.myfishbowl.com
Web port for external connections - 2555
Internal web port - 2456
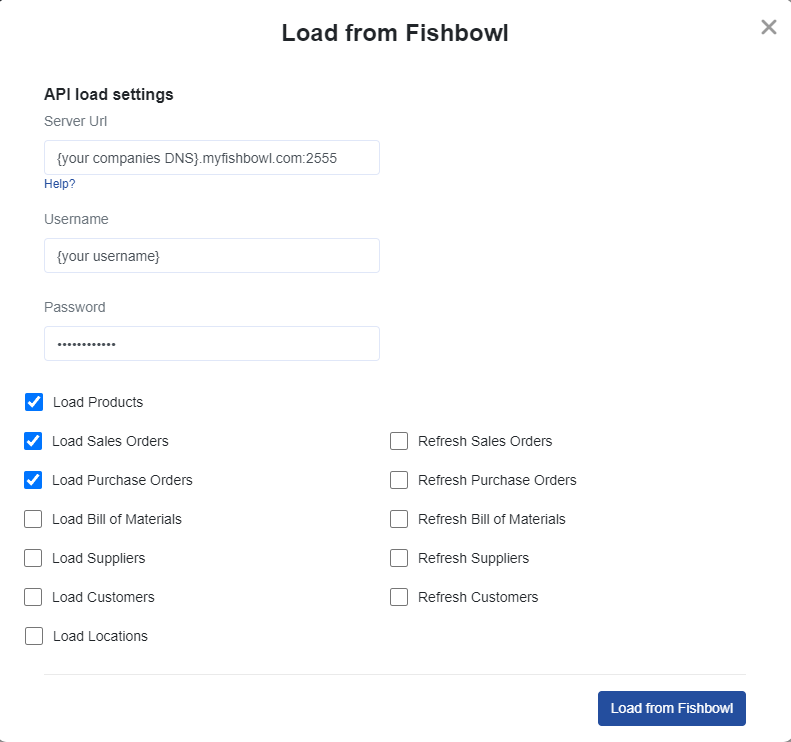
Username: Your Username you log into Fishbowl with
Password: Your Password you log into Fishbowl with.
This needs to be done inside by Fishbowl by an administrator you will need to allow StockTrim to connect.
Step 3: Inventory status and order plans
On the dashboard you will see how many products you are overstocked or understocked with, as well as the related costs. Click, 'See my plan' to see the optimal reorder points and suggested order quantities to save you these costs.


Step 4: Demand Analysis
On each product, you can select the 'i' icon to bring up the demand analysis. See your trends, and see how the forecasts are calculated so you can oversee the results to have confidence they're correct.

Step 5: Global Settings
Click the settings wheel to set the lead time and service level. Make sure that the lead time is set so that you have enough stock to cover the time between when you place the orders with your suppliers and when they arrive.


You've now completed setting up your integration. If you have any questions or need further assistance, feel free to reach out to our support team. Happy forecasting!